Here are some links to items I have used and really like.
These are amazon links and if you click and order something, I will get a small percentage that helps me pay for the materials used in these videos.
It wont cost you one dime more and if nothing else, amazon is a great place to read reviews and compare pricing.
knipex mini bolt cutters – http://amzn.to/2xjzgPE
lincoln viking 3350 with 4C auto dark helmet – http://amzn.to/2z0ONpG
welding magnifier/cheater lens – http://amzn.to/2fTld0F
Lincoln TIG 200 square wave tig welder – http://amzn.to/2fRUtxt
Walter mill scale wheel – http://amzn.to/2xjKt7R
Walter flap discs – http://amzn.to/2fThErq

Video Transcript:
Furick Ceramic 12 Tig Cup
Today we’re doing a TIG welding on carbon steel. I’m going to show off a new TIG cup that I’ve just added to my store. We’re going to do a little cleaning on some hot rolled mill scale. I’m going to show a wheel that will get that off really well without clogging up or slicking over, and whatever else comes up along the way. Let’s do it.
I picked this wheel up at my local welding supplier a while back. It’s a Walter wheel. It’s designed for removing mill scale from hot rolled steel. So, the waffle pattern or diamond pattern, whatever you call it, is to prevent that wheel from slicking over, glazing up, loading up with that mill scale. There’s different levels of mill scaling, usually plate is thicker than, say, square tubing. Some of its really thick and hard to grind. This doesn’t seem bad.
So, for the square tubing, it’s usually got a little thinner coating on it, so a flap disk usually works just fine for that. Several other ways you could grind this off too. A sanding disk would work probably just fine, but a flap disk is a good thing to have on there all the time.
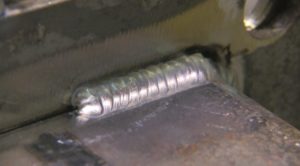
Now, here’s a good example of why you would want to remove the hot rolled mill scale for TIG welding. This is why. You can’t really see what’s going on. You’ve got all these oxides floating around. Really can’t distinguish the puddle. Doesn’t look good. Even just for the sake of it making more enjoyable, you want to clean all that mill scale off of there.
This is a wide based combination square called a Le Square. I use it all the time. I sell it on the store as well. So, after making some marks on there, lay it out, getting these things centered up, we’ll get ready to weld.
Alright, I want to show off the cup a little bit now. I just added these to the store. These are Furick number 12 ceramic cups. I already sold the Pyrex style with … Michael Furick came out with these ceramic models, and they’re getting super high, super good reviews from users on Instagram, so it’s time for me to sell them as well. They work with a stubby gas lens kit that I sell as well, so these type have threads on them instead of the O-rings situation. I’m going to set this thing to a 170 Amps. You can weld most any thickness if you’re willing to do multiple passes with 170 Amps. My friend Alex Brown set me these KNIPEX mini-bolt cutters and they are awesome.
I’m using a Viking 3350 helmet today. I’ve had a lot of people ask me about how do I see through the helmet. Well, I’ve got a cheater lens in here and I look through the top of my bifocals, and it works okay for me. I wish I could see a little bit better actually, but it is what it is.
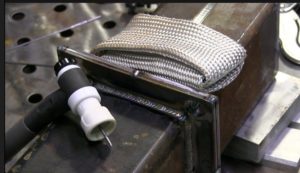
So, we’ll get tacks on the corners here, and a good rule of thumb is to try to make your tacks a little bit smaller than the weld will be. Makes it look a lot better in the end. Got one tack on each corner on two pieces. And there’s a reason I’m doing two separate pieces today, and that’s just because I want to explain that when you have pieces like this, both of them with a phalange plate on them, sometimes it helps to clamp on board, tack weld them back to back, to keep them straight. It’s kind of like opposing forces. It has a tendency to want to pull and cup in the direction of the weld, so they want to curl up.
So, one of them is pulling against the other when you weld both of them with a clamped or a tacked welded, and you wind up with a pretty straight phalange. And I’m just putting really kind of sort of cold tack weld, sort of like … you call these strap welds. In other words, I’m not really penetrating a lot and I can grind them off very easily when I’m finished, and it’ll pop loose.
So, 170 Amps, pretty much full pedal, and that’s what it looks like. Pretty clean, the gas shielding is pretty much perfect. I’m stopping here just to give you a little glimpse of the shielding discoloration or lack thereof. There is absolutely no discoloration in there. The cup is doing a great job. I’ve got it extended out not quite three-quarters on an inch there. And you can go a little bit further than without any problem. I’ve gon up to an inch. I’m using 25 CFH here. You could go up to probably 35 CFH with no problem and extend it a full inch without any issues. I’ve done it before anyways. It’s a little bit different for every situation, but that’s when you … that’s when this cup real excels. You don’t really need a cup like this on this particular job, or a situation like this, but if you need to extend the electrode out and still maintain really, really good gas shielding, this is a really great cup for those kinds of things. Really be a good cup for things like titanium exhaust and things like that too.
Let’s talk about Tight Arc versus Long Arc now because this is a mistake that a lot of learners make. You’re holding too long an arc is a problem. Here’s a long arc. The rod is blobbing into the puddle instead of feeding in there. The puddle’s swimming around. It’s not focused. Here all I did was … all I did was tighten up the arc. No amperage change or anything. Everything got about 100% better.
Alright, let’s go back to the job that we were working on now. You notice that little strap weld, that little cold tack up at the top. That’ll grind off really easily when I’m done here. So, on the corners I just backed up there briefly to make sure everything is kind of blended and fused together, and then just try to take off and try to keep a steady pace.
All these are starting to look alike, so we’ll do one more run and call it a day. Now, it really should be kind of taking my time, letting things cool off, but I’m kind of in a little bit of a hurry, so I’m just welding back to back, and it’s getting pretty hot. So, I threw on a TIG Finger there. Actually, that’s an XL that I have on, and I don’t have to worry about my fingers getting roasted, and I can concentrate on keeping a nice tight arc, trying to be steady. And that’s really the name of the game. Keep that arc nice and tight. Move ahead the same amount. Slip the same amount of rod in there each time, and that’s how you kind of achieve some uniformity.
Incidentally, these things aren’t going to go anywhere. This is just some leftover stuff that J.D. had, so I’ll probably cut everything loose and reuse them for another video. But thanks, J.D., for the material. These items are available on my store at WeldMonger.com. Thanks for watching.


Leave a Reply